Websters dictionary defines symbiosis as, "the living together in more or less intimate association or close union of two dissimilar organisms, a cooperative relationship." We are finding that the more symbiotic relationships that we can build between the different components of our homestead the more harmony we have, the healthier the livestock/garden/system is and the more money we save.
As I loaded old hay in the back of the truck this week I started thinking about all the ways we are integrating and building symbiotic relationships and thought "what a great idea for a blog series" so here we are.
Showing posts with label Rabbits. Show all posts
Showing posts with label Rabbits. Show all posts
Thursday, March 27, 2014

Tuesday, January 21, 2014
Doesn't everyone butcher roosters when school is cancelled?
Happiness is finding out your peds class is cancelled on a day it is sunny and warm enough to butcher those extra roosters that really need to be relocated to the freezer. I am in my last semester of RN school and homesteading tends to take a back seat to school these days. Having a whole day to devote to the farm is extra special.
**** Advance warning, there are actual butchering day photos to follow. If this bothers you hit the back arrow now.......
**** Advance warning, there are actual butchering day photos to follow. If this bothers you hit the back arrow now.......
Saturday, January 11, 2014
Before pictures..... AKA the cute and fuzzy side of rabbit farming........
These are our current cuties. There is just something adorable and sumo wrestleresk about fat baby bunnies. These three are extra special because they are the last litter from Blossom one of our two founding does. The other founding doe and our founding buck were retired a week ago and after this litter is weened Blossom will retire as well.
Friday, January 3, 2014
Rabbit Rabbit Everywhere...........
This is a continuation of rabbit processing day. In the past we have cut up and frozen our rabbit meat the same day it was harvested but this time we are trying something different. This time we let the carcasses chill in the fridge for a couple of days until they were past the rigor stage. This is supposed to make the meat more tender.
I debone the backs and most of the hind legs (I leave a few hind legs whole). The forelegs, rib cages backbones and hind leg bones all go in the stock pot.

I debone the backs and most of the hind legs (I leave a few hind legs whole). The forelegs, rib cages backbones and hind leg bones all go in the stock pot.

Monday, December 30, 2013
Rabbit Processing Day.......
With the move to our new home I have gotten way behind on butchering rabbits. My old butcher station was a porcelain sink on two saw horses, thanks to my husband Rick, my setup has had a makeover.


My new butchering station is between two sheds. This gave me a wall to mount things on, access to water and shade. The two shelf brackets mounted to the wall are my rabbit station and the orange cone is my chicken station.
Thursday, August 2, 2012
Our First Babies Graduate.....
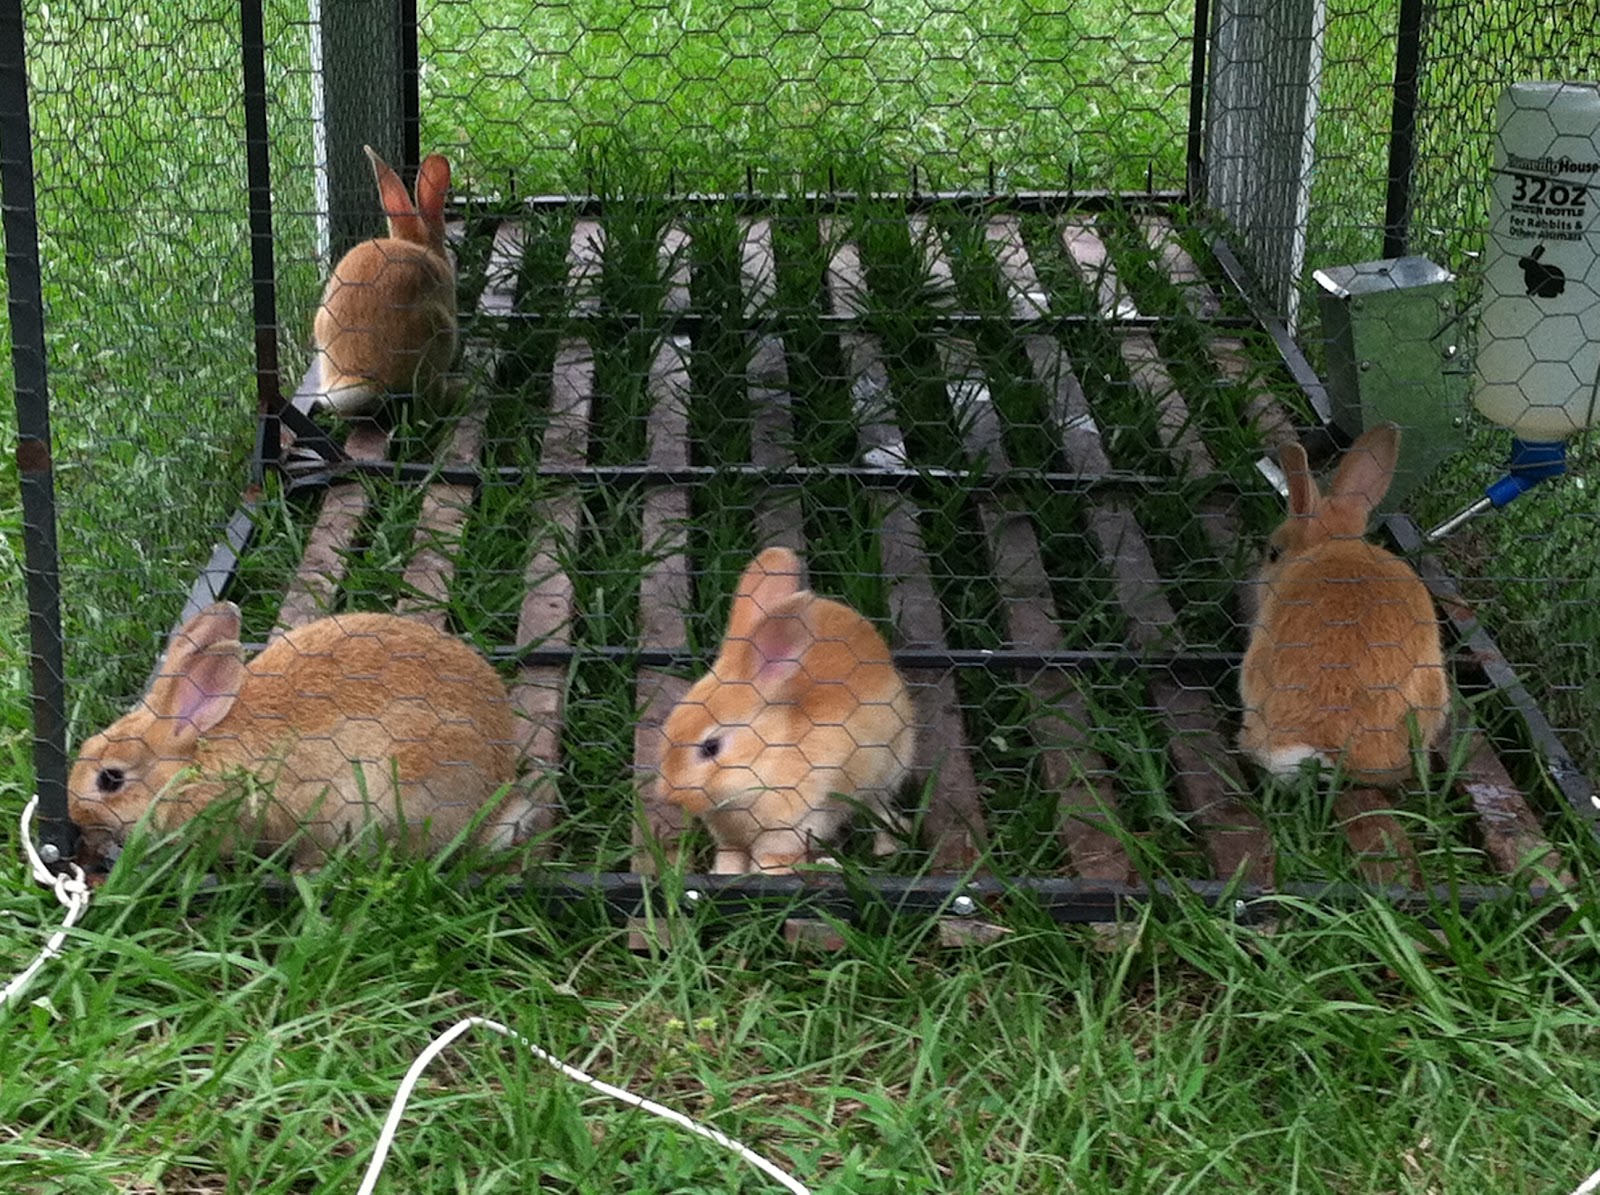
Our first litter of rabbits weened and graduated to a pasture Hare Pen today. All of our breeding stock were purchased as babies and raised up to breeding age so today's first litter weened is a major mile stone for our little rabbitry. We have two more litters 4 weeks behind these and more on the way. We also have more purchased breeding stock and broilers growing out in hare pens. We started with a variety of weened stock from various sources and grew them out so we could be picky about breeding stock and cull the rest as broilers.
Tuesday, July 31, 2012
Rabbit Breeding Experiment

When we started acquiring stock for the Rabbitry we bought two Flemish Giant does to use in a cross experiment. Although they get very large, Flemish Giants put most of their energy into bone structure before putting much flesh on. This makes them a less than optimal choice for meat production. I hypothesized that by breeding a standard buck to a Giant doe I might be able to achieve a happy medium between size and feed conversion. The first litter of crosses is 18 days old and represented by the grey kit on the left. The brown kit on the right is 20 days old, from the same sire but a standard mom. As you can see although not marked, there is a size difference in the kits. The Flemish mom kindled 7, 2 were dead at or shortly after birth, a third runt died the next day and we were left with 2 nice sized kits (the grey being one of them) and 2 extreme runts which have miraculously survived. The second Flemish doe kindled 14 nice sized kits on the cage floor without having pulled any fur, all were dead by the time we found them. This being the case between the strange assortment of sizes in the first doe and the second does dead litter we have little data so far. The plan is to keep litter size and weaned weigh info on these litters and evaluate the results.
What "out of the box" experiments have you run on your farm?
Here are some great rabbit recipes from Larson Rabbitry
Recipies
Barbecued Marinated Rabbit
Entertaining on a busy schedule? Prepare this recipe the night before - the longer it sits, the better it tastes! Preparation time, 15 minutes; Marinating time, 3 to 4 hours or overnight; Cooking time, 1.5 to 2 hours. Makes eight servings.
heavy duty aluminum foil
cooking oil
2 medium carrots, diced 2
2 medium onions, diced 2
2 small tomatoes, diced 2
2 cloves garlic, crushed 2
2 whole rabbits (1.25 kg each) 2
less heart, liver and kidneys
2 whole cinnamon sticks 2
125 mL dry sherry 1/2 cup
10 mL dried parsley 2 tsp
5 mL dried oregano or rosemary 1 tsp
5 mL salt 1 tsp
freshly ground pepper
cooking oil
2 medium carrots, diced 2
2 medium onions, diced 2
2 small tomatoes, diced 2
2 cloves garlic, crushed 2
2 whole rabbits (1.25 kg each) 2
less heart, liver and kidneys
2 whole cinnamon sticks 2
125 mL dry sherry 1/2 cup
10 mL dried parsley 2 tsp
5 mL dried oregano or rosemary 1 tsp
5 mL salt 1 tsp
freshly ground pepper
Prepare foil pouch, big enough to enclose the rabbits, by joining two large sheets of foil together, forming seam. Brush foil with oil. Place prepared vegetables and garlic on foil. Arrange rabbits over vegetables and place cinnamon stick in empty cavity of each rabbit.
In small bowl, combine remaining ingredients and pour over rabbits. Close foil pouch tightly to completely seal in marinade, removing most of the air. Refrigerate for 3 to 4 hours or overnight.
Place foil pouch on 180°C (350°F) barbecue grill, on the top shelf, or bake in 180°C (350°) oven, for 1 to 1.5 hours (flip over after 45 minutes), or until rabbit is almost cooked. Carefully open foil and lift rabbits onto lightly oiled barbecue grill or oven broiling rack. Brush rabbits lightly on both sides with oil. Cook, turning frequently until evenly grilled or broiled on both sides (about 10 to 15 minutes each side). Remove from grill or oven; discard cinnamon sticks and serve.
*** A store bought marinade can replace spices to make things easier! *** If using marinade sauce, brush extra sauce onto rabbit after removing from foil to glaze the meat.
Braised Rabbit with Strawberry Mint Sauce
A refreshing sauce of strawberries and mint provides a delincious contrast to the mild flavor of tender brazed rabbit. Preparation time, 10 - 20 minutes; Cooking time, 40 minutes. Makes four servings.
25 mL butter 2 tbsp
5 mL red wine vinegar 1 tsp
2 mL ground cinnamon 1/2 tsp
1 mL ground cloves 1/4 tsp
4 legs of rabbit, 2 front, 2 back 4
125 mL rabbit stock 1/2 cup
or chicken stock
125 mL dry white wine or apple juice 1/2 cup
500 mL strawberries, fresh 2 cups
or thawed frozen
3 to 4 sprigs of fresh peppermint 3 or 4
or 10 mL dried mint (2 tsp)
5 mL red wine vinegar 1 tsp
2 mL ground cinnamon 1/2 tsp
1 mL ground cloves 1/4 tsp
4 legs of rabbit, 2 front, 2 back 4
125 mL rabbit stock 1/2 cup
or chicken stock
125 mL dry white wine or apple juice 1/2 cup
500 mL strawberries, fresh 2 cups
or thawed frozen
3 to 4 sprigs of fresh peppermint 3 or 4
or 10 mL dried mint (2 tsp)
In a large skillet, over medium high heat, melt butter. Stir in vinegar, cinnamon and cloves. Add rabbit pieces and brown lightly on either side, about 5 to 7 minutes. Add stock and wine or apple juice. Bring mixture to a boil, then cover and reduce heat to simmer. Cook rabbit 30 minutes or until tender.
In blender or food processor fitted with metal blade, process strawberries and mint until smooth. Remove rabbit from skillet and transfer to serving platter; keep warm. Drain cooking liquid from skillet and add strawberry puree. Heat sauce over medium heat 3 to 5 minutes stirring continuously until warm (do not boil.) Pour sauce over rabbit. Garnish with strawberry slices and mint.
Saddle of rabbit in mustard sauce
You will need:
1/2 pound fileted saddle of rabbit
3/4 cup of heavy cream
1 tablespoon Dijon Mustard
1 tsp. coarsely ground black pepper
1 or 2 cloves of garlic
1/2 pound fileted saddle of rabbit
3/4 cup of heavy cream
1 tablespoon Dijon Mustard
1 tsp. coarsely ground black pepper
1 or 2 cloves of garlic
Dredge the meats lightly in a little flour. Saute until browned. Heat cream, mustard, pepper, and garlic in saute pan until boiling. Add the browned rabbit, cook until the rabbit is cooked through and the sauce is thickened, about 4 or 5 minutes. Serves two.
Boneless Rabbit Stew
1 whole rabbit
flour
ground black pepper
garamasala
slow cooker or casserole dish
vegetables to taste (celery is good!)
Cut the rabbit into three sections, then cut off all easily removed meat with a knife and then cut this into small (1/2 inch) cubes. Dredge cubes in flour with black pepper and garamasala to taste. Put remaining bones and meat into a saucepan and cover with water. Bring to a boil and simmer for five minutes. Put boiled bones through sieve, keeping the stock. Let bones cool. Saute cubes in small amount of vegetable oil until browned. Remove remainder of meat from cooled bones by hand. Put all ingredients (except bones!) into casserole or slow cooker, bring to the boil and then simmer until cooked.
flour
ground black pepper
garamasala
slow cooker or casserole dish
vegetables to taste (celery is good!)
Cut the rabbit into three sections, then cut off all easily removed meat with a knife and then cut this into small (1/2 inch) cubes. Dredge cubes in flour with black pepper and garamasala to taste. Put remaining bones and meat into a saucepan and cover with water. Bring to a boil and simmer for five minutes. Put boiled bones through sieve, keeping the stock. Let bones cool. Saute cubes in small amount of vegetable oil until browned. Remove remainder of meat from cooled bones by hand. Put all ingredients (except bones!) into casserole or slow cooker, bring to the boil and then simmer until cooked.
Friday, July 27, 2012
Do you have those projects..........
Do you have those projects that it takes you a while to get to, then when you do they were SO easy you kick yourself for putting them off? I have had all of the stuff to set up the automatic water system in the rabbitry and on the rabbit tractors for WEEKS. Every day when I fill bottles I think, I really need to install the automatic waterers. Between the heat, being busy and flat out procrastination I didn't do it until today. Wouldn't you know, it was SO easy and SO fast, I am still kicking myself for putting it off.
The system I have set up on the tractors and in the rabbitry is a very simply gravity system using a five gallon bucket for the reservoir, tubing, t connectors, these cool gizmos that keep the tubing off the cage so they can't chew it, other cool gizmos the sipper fits into to latch on the cage and the sippers themselves. I bought filtered connectors to go on the buckets but I did not use them I just drilled a hole and put the tubing straight into the bucket like we do for the auto waterers on the chicken tractors. I have not finished installing cages in the rabbitry but have all the pieces to run water to them easily when I hang the cages. I ordered everything but the buckets from:
http://www.bunnyrabbit.com/price/edstrom.htm
Here are photos of how it is set up.
 The 5 gallon reservoir is sitting on an old ladder and bungied to the corner post for now. This is temporary until we decide how we want it permanently.

 The tubing runs across the top of each row with individual feeder lines to each sipper.

 This handy gadget holds the sipper on the cage and keeps the tubing out of the reach of sharp teeth.
 One can never rest throwing cute baby bunny pictures in.....

The system I have set up on the tractors and in the rabbitry is a very simply gravity system using a five gallon bucket for the reservoir, tubing, t connectors, these cool gizmos that keep the tubing off the cage so they can't chew it, other cool gizmos the sipper fits into to latch on the cage and the sippers themselves. I bought filtered connectors to go on the buckets but I did not use them I just drilled a hole and put the tubing straight into the bucket like we do for the auto waterers on the chicken tractors. I have not finished installing cages in the rabbitry but have all the pieces to run water to them easily when I hang the cages. I ordered everything but the buckets from:
http://www.bunnyrabbit.com/price/edstrom.htm
Here are photos of how it is set up.


Saturday, June 30, 2012
Better late than never......

After many hours of enjoying and learning from other blogs it is time to start one of our own. In an earlier life I considered blogging to be an act of the self-absorbed. In time I have come to rely on the farming and homesteading advice from my favorite blogs. It must have been a truely busy day if I didn't check to see what was new with the ladies of Polyface Farms at http://polyfacehenhouse.com/ Sharing recipes, ideas and the struggles of everyday homesteading makes us all stronger and feel less alone.

The goal of our little corner of the blogoshere is to share, entertain, and every once in a while maybe even teach those who are even more newbie homesteaders than we are (though we are still very wet behind the ears ourselves). So grab a cup of tea and come see us once in a while.

Subscribe to:
Posts (Atom)